SharePoint 2010 dev environment in Azure in 2020
As the title indicates, I have recently needed to set up SharePoint 2010 in Azure. As any good consultant would, I need to provide due diligence to the recommendations and solutions I suggest for my customers. Unfortunately for me, one of these customers is running SharePoint 2010. So I needed to build myself a development environment.
Fortunately there are some Microsoft docs with instructions of how to do this for SharePoint 2016.
I’ve taken these and slightly enhanced them to work for my use case.
Azure Initialisation
First we need to login to an Azure subscription and create a Resource Group.
- Log into Azure
Connect-AzAccount - Set the active subscription
#View subs Get-AzSubscription | Sort Name | Select Name, Id $subId = "8ae46fa7-b413-4221-be6a-89a4df688f49" Select-AzSubscription $subId - Create the resource group.
Note. Use
Get-AzLocationto list available locations $rgName="sharepoint-migration-dev" $locName="UK South" New-AzResourceGroup -Name $rgName -Location $locName
Network Creation and Config
The next step is to create the vnet, subnet and Network Security Group (NSG).
- Create the vnet and subnet
$locName = (Get-AzResourceGroup -Name $rgName).Location $subNetName = "SP2010Subnet" $vNetName = "SP2010Vnet" $spSubnet=New-AzVirtualNetworkSubnetConfig -Name $subNetName -AddressPrefix 10.0.0.0/24 New-AzVirtualNetwork -Name $vNetName -ResourceGroupName $rgName -Location $locName -AddressPrefix 10.0.0.0/16 -Subnet $spSubnet -DNSServer 10.0.0.4 - Create network security groups and apply rules to allow RDP and HTTP traffic.
$rule1=New-AzNetworkSecurityRuleConfig -Name "RDPTraffic" -Description "Allow RDP to all VMs on the subnet" -Access Allow -Protocol Tcp -Direction Inbound -Priority 100 -SourceAddressPrefix Internet -SourcePortRange * -DestinationAddressPrefix * -DestinationPortRange 3389 $rule2 = New-AzNetworkSecurityRuleConfig -Name "WebTraffic" -Description "Allow HTTP to the SharePoint server" -Access Allow -Protocol Tcp -Direction Inbound -Priority 101 -SourceAddressPrefix Internet -SourcePortRange * -DestinationAddressPrefix "10.0.0.6/32" -DestinationPortRange 80 New-AzNetworkSecurityGroup -Name $subNetName -ResourceGroupName $rgName -Location $locName -SecurityRules $rule1, $rule2 - Associate the NSG with the vnet
$vnet=Get-AzVirtualNetwork -ResourceGroupName $rgName -Name $vNetName
$nsg=Get-AzNetworkSecurityGroup -Name $subNetName -ResourceGroupName $rgName
Set-AzVirtualNetworkSubnetConfig -VirtualNetwork $vnet -Name $subNetName -AddressPrefix "10.0.0.0/24" -NetworkSecurityGroup $nsg
$vnet | Set-AzVirtualNetwork
DC Creation
Now we need to create the Domain Controller.
- Create an availability set for the domain controller VM
New-AzAvailabilitySet -ResourceGroupName $rgName -Name dcAvailabilitySet -Location $locName -Sku Aligned -PlatformUpdateDomainCount 5 -PlatformFaultDomainCount 2 - Create a public ip address and nic for the VM and add them to the subnet that was created earlier.
$vmName="adVM" $vmSize="Standard_D1_v2" $vnet=Get-AzVirtualNetwork -Name $vNetName -ResourceGroupName $rgName $pip = New-AzPublicIpAddress -Name ($vmName + "-PIP") -ResourceGroupName $rgName -Location $locName -AllocationMethod Dynamic $nic = New-AzNetworkInterface -Name ($vmName + "-NIC") -ResourceGroupName $rgName -Location $locName -SubnetId $vnet.Subnets[0].Id -PublicIpAddressId $pip.Id -PrivateIpAddress 10.0.0.4 $avSet=Get-AzAvailabilitySet -Name dcAvailabilitySet -ResourceGroupName $rgName - Create a new VM config, associate it with the availability set and and some disks.
$vm=New-AzVMConfig -VMName $vmName -VMSize $vmSize -AvailabilitySetId $avSet.Id $vm=Set-AzVMOSDisk -VM $vm -Name ($vmName +"-OS") -DiskSizeInGB 128 -CreateOption FromImage -StorageAccountType "Standard_LRS" $diskConfig=New-AzDiskConfig -AccountType "Standard_LRS" -Location $locName -CreateOption Empty -DiskSizeGB 20 $dataDisk1=New-AzDisk -DiskName ($vmName + "-DataDisk1") -Disk $diskConfig -ResourceGroupName $rgName $vm=Add-AzVMDataDisk -VM $vm -Name ($vmName + "-DataDisk1") -CreateOption Attach -ManagedDiskId $dataDisk1.Id -Lun 1 - Get a credential object - This will be the admin account for the VM.
#This will be used to rdp into the VM $cred=Get-Credential -Message "Type the name and password of the local administrator account for adVM." - Set the VM OS and Image (Windows Server 2012 R2), add the nic and create the VM.
$vm=Set-AzVMOperatingSystem -VM $vm -Windows -ComputerName $vmName -Credential $cred -ProvisionVMAgent -EnableAutoUpdate $vm=Set-AzVMSourceImage -VM $vm -PublisherName MicrosoftWindowsServer -Offer WindowsServer -Skus 2012-R2-Datacenter -Version "latest" $vm=Add-AzVMNetworkInterface -VM $vm -Id $nic.Id New-AzVM -ResourceGroupName $rgName -Location $locName -VM $vm - Download the RDP connection file from the Azure portal and login into the box using the creds
($adVM/username)
DC Config
The following set of commands are executed on the new DC VM.
- Add an additional disk (you will need to accept the format prompt)
Get-Disk | Where PartitionStyle -eq "RAW" | Initialize-Disk -PartitionStyle GPT -PassThru | New-Partition -AssignDriveLetter -UseMaximumSize | Format-Volume -FileSystem NTFS -NewFileSystemLabel "WSAD Data" - Configure VM as Domain controller (this will restart the VM).
Install-WindowsFeature AD-Domain-Services -IncludeManagementTools $domainName = "corp.groveale.com" Install-ADDSForest -DomainName $domainName -DatabasePath "F:\NTDS" -SysvolPath "F:\SYSVOL" -LogPath "F:\Logs" - Log back in using your RDP file but this time use the domain (corp/username). Run the following command to create the SP Farm DB user
Add-WindowsFeature RSAT-ADDS-Tools New-ADUser -SamAccountName sp_farm_db -AccountPassword (read-host "Set user password" -assecurestring) -name "sp_farm_db" -enabled $true -PasswordNeverExpires $true -ChangePasswordAtLogon $false - Set an Auto shutdown policy in azure to save those credits :D
SQL Server creation
Now that we have a domain we can create the SQL server.
- Initialise some variables and create an availability set for the SQL VM.
$locName=(Get-AzResourceGroup -Name $rgName).Location # vnet name from earlier $vNetName = "SP2010Vnet" #Create the SQL Server virtual machine $vmName="sqlVM" $vmSize="Standard_D3_V2" $avaliblitySetName = "$vmName-AvailabilitySet" #Create an availability set for SQL Server virtual machines New-AzAvailabilitySet -ResourceGroupName $rgName -Name $avaliblitySetName -Location $locName -Sku Aligned -PlatformUpdateDomainCount 5 -PlatformFaultDomainCount 2 - Create a public ip address and nic for the VM and add them to the subnet that was created earlier.
$vnet=Get-AzVirtualNetwork -Name $vNetName -ResourceGroupName $rgName $pip=New-AzPublicIpAddress -Name ($vmName + "-PIP") -ResourceGroupName $rgName -Location $locName -AllocationMethod Dynamic $nic=New-AzNetworkInterface -Name ($vmName + "-NIC") -ResourceGroupName $rgName -Location $locName -SubnetId $vnet.Subnets[0].Id -PublicIpAddressId $pip.Id -PrivateIpAddress "10.0.0.10" - Create a new VM config, associate it with the availability set and and some disks.
$avSet=Get-AzAvailabilitySet -Name $avaliblitySetName -ResourceGroupName $rgName $vm=New-AzVMConfig -VMName $vmName -VMSize $vmSize -AvailabilitySetId $avSet.Id $vm=Set-AzVMOSDisk -VM $vm -Name ($vmName +"-OS") -DiskSizeInGB 128 -CreateOption FromImage -StorageAccountType "Standard_LRS" $diskSize=100 $diskConfig=New-AzDiskConfig -AccountType "Standard_LRS" -Location $locName -CreateOption Empty -DiskSizeGB $diskSize $dataDisk1=New-AzDisk -DiskName ($vmName + "-SQLData") -Disk $diskConfig -ResourceGroupName $rgName $vm=Add-AzVMDataDisk -VM $vm -Name ($vmName + "-SQLData") -CreateOption Attach -ManagedDiskId $dataDisk1.Id -Lun 1 - Get a credential object - This will be the admin account for the VM.
#This will be used to rdp into the VM $cred=Get-Credential -Message "Type the name and password of the local administrator account of the SQL Server computer." - Create the SQL server (SQL 2008 on and 2008 Windows server)
$vm=Set-AzVMOperatingSystem -VM $vm -Windows -ComputerName $vmName -Credential $cred -ProvisionVMAgent -EnableAutoUpdate $vm=Set-AzVMSourceImage -VM $vm -PublisherName MicrosoftSQLServer -Offer SQL2008R2SP3-WS2008R2SP1 -Skus Standard -Version "latest" $vm=Add-AzVMNetworkInterface -VM $vm -Id $nic.Id New-AzVM -ResourceGroupName $rgName -Location $locName -VM $vm -
Download the RDP connection file and login into the box using the creds
($vmName/username) - Join the SQL VM to the domain. Then log back in using the domain admin.
Add-Computer -DomainName "corp.groveale.com"
Restart-Computer
SQL Server Config
The following set of commands are executed on the new SQL VM.
- This is where it gets fun. Since Window Server 2008 is pretty old we need to use some old school tools to configure the disks,
DISKPART#This will start diskpart DiskPart.exe List disk #This may differ for you implementation Select disk 2 #Create a 10GB partition CREATE PARTITION PRIMARY SIZE=10000 #Assign Letter F ASSIGN LETTER=F #LEave diskpart Exit - Create some directories
md f:\Data md f:\Log md f:\Backup -
Configure SQL to user these new directories. Firstly, you may need to log back out and login using the local admin (sqlVM\username). Launch SQL Management Studio. Connect to the SQL server using Windows authentications. Once connected, add a new login so you can connect using your domain admin.
-
Right click on logins.

-
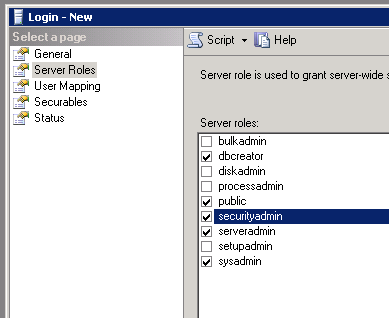
You may need to change the search location so your corp\admin will be searchable. Make sure you add the sysadmin role.
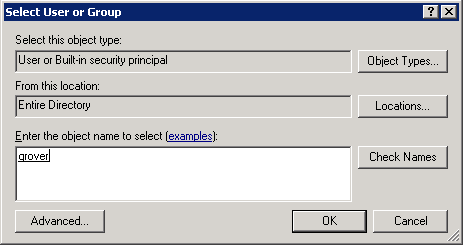
-
Make sure you add the sysadmin role.
-
Repeat these steps for the sp_farm_db role if you created it earlier.
-
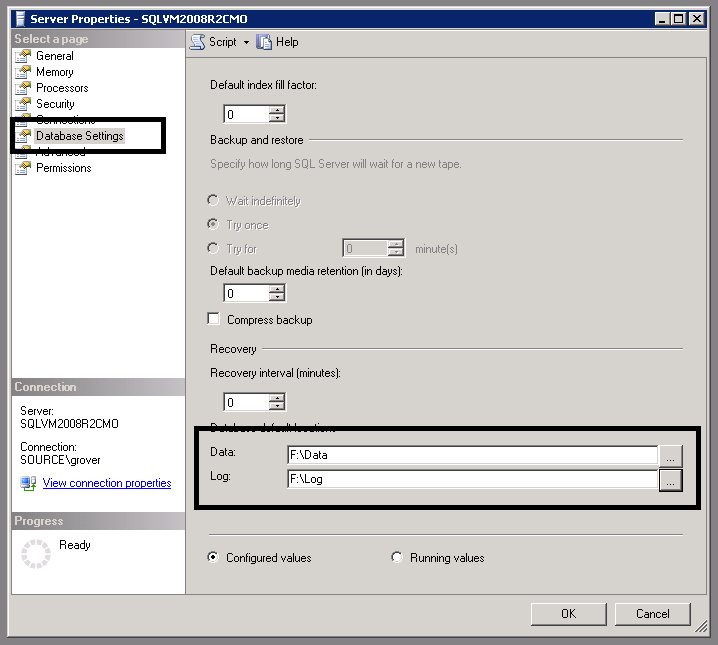
Update the database settings to use the new drive. Right click the instance, open database settings.
- Firewall rules. Again we can’t use
New-NetFirewallRuleso we need to use older tools. I could not figure out how to add multiple ports in one command. So there are two for you to runnetsh advfirewall firewall add rule name="SQL Server ports 1433 and 1434" dir=in action=allow remoteip=any localport=1433-1434 protocol=TCP netsh advfirewall firewall add rule name="SQL Server ports 5022" dir=in action=allow remoteip=any localport=5022 protocol=TCP - Again, set an auto shutdown policy in azure to save those credits
SharePoint 2010 VM Creation
Finally we have made it to SharePoint section of this guide. As Microsoft does not provide a SharePoint 2010 image we will need to install and configure SharePoint ourselves. We will therefore create a Windows 2008 SP2 server.
- If not already initialised. Create the
$rgNamevariable$rgName="sharepoint-migration-dev" - Initialise some variables and create an availability set for the SharePoint VM
$locName=(Get-AzResourceGroup -Name $rgName).Location
$vNetName = "SP2010Vnet"

#Create the SharePoint Server virtual machine
$vmName="sp10VM"
$vmSize="Standard_D3_V2"
$vnet=Get-AzVirtualNetwork -Name $vNetName -ResourceGroupName $rgName

$avaliblitySetName = "$vmName-AvailabilitySet"

$dnsName = "uniqueDNSName"

#Create an availability set for SharePoint Server virtual machines
New-AzAvailabilitySet -ResourceGroupName $rgName -Name $avaliblitySetName -Location $locName -Sku Aligned  -PlatformUpdateDomainCount 5 -PlatformFaultDomainCount 2
- Create a public ip address and nic for the VM and add them to the subnet that was created earlier.
$vm=New-AzVMConfig -VMName $vmName -VMSize $vmSize $pip=New-AzPublicIpAddress -Name ($vmName + "-PIP") -ResourceGroupName $rgName -Location $locName -AllocationMethod Dynamic $vnet=Get-AzVirtualNetwork -Name $vNetName -ResourceGroupName $rgName $nic=New-AzNetworkInterface -Name ($vmName + "-NIC") -ResourceGroupName $rgName -Location $locName -SubnetId $vnet.Subnets[0].Id -PublicIpAddressId $pip.Id -PrivateIpAddress "10.0.0.6" - Create a new VM config, associate it with the availability set and and some disks.
$avSet=Get-AzAvailabilitySet -Name $avaliblitySetName -ResourceGroupName $rgName $vm=New-AzVMConfig -VMName $vmName -VMSize $vmSize -AvailabilitySetId $avSet.Id $vm=Set-AzVMOSDisk -VM $vm -Name ($vmName +"-OS") -DiskSizeInGB 128 -CreateOption FromImage -StorageAccountType "Standard_LRS" - Get a credential object - This will be the admin account for the VM.
#This will be used to rdp into the VM $cred=Get-Credential -Message "Type the name and password of the local administrator account." - Create the SharePoint server (Windows 2008R2)
$vm=Set-AzVMOperatingSystem -VM $vm -Windows -ComputerName $vmName -Credential $cred -ProvisionVMAgent -EnableAutoUpdate
$vm=Set-AzVMSourceImage -VM $vm -PublisherName "MicrosoftWindowsServer" -Offer "WindowsServer" -Skus "2008-R2-SP1" -Version "latest"
$vm=Add-AzVMNetworkInterface -VM $vm -Id $nic.Id
New-AzVM -ResourceGroupName $rgName -Location $locName -VM $vm
Note. To get details of available SharePoint and Windows images use the below commands
# SharePoint
Get-AzVMImageSku -Location ukwest -PublisherName MicrosoftSharePoint -Offer MicrosoftSharePointServer

# Windows server
Get-AzVMImageSku -Location ukwest -PublisherName MicrosoftWindowsServer -Offer WindowsServer
-
Download the RDP connection file and login into the box using the creds
($vmName/username) -
Join the SharePoint VM to the domain. Then log back in using the domain admin.
Add-Computer -DomainName "corp.groveale.com"
Restart-Computer
SharePoint 2010 Installation
To install SharePoint we will use a great tool called auto sp installer which automates the installation of SharePoint using PowerShell.
- Create Service Accounts (Create in Active directory (not on local SharePoint server))
$pass = read-host "Set user password" -assecurestring
$accounts = "SP_CacheSuperUser", "SP_CacheSuperReader", "SP_Services", "SP_PortalAppPool", "SP_ProfilesAppPool", "SP_SearchService", "SP_SearchContent", "SP_ProfileSync"
$accounts | % { New-ADUser -SamAccountName $_ -AccountPassword $pass -name $_ -enabled $true -PasswordNeverExpires $true -ChangePasswordAtLogon $false }
Make sure you provide the SP_ProfileSync user with Replicate Directory Changes Active Directory permission. Instructions here
-
Download 7zip, auto sp installer and SharePoint 2010 media. There is s handy gist to disable that annoying enhanced ie security.
- Extract media to Auto sp installer location.
AutoSPInstaller-master\SP\2010\SharePoint -
Go and create your own autoSP installer config file at
https://autospinstaller.com/FarmConfiguration. Replace the example config file with your newly created config file. -
Before running that .bat file. I have found it more successful to install the prereqs first. You can run the prereq installer manually.
AutoSPInstaller-master\SP\2010\SharePoint\PrerequisiteInstaller.exe - There may be some prereqs that fail. I needed to download the SQL 2008 native client, ADO and Sync Framework 1.0 and install separately.
With the SQL client - ensure you install the non R2 version. And reboot after intall
For the Sync Framework download you will need to the file at Microsoft Sync Framework\Synchronization.msi
If it does fail on anything else, try and fix the failures then rerun the pre req installer. If this succeeds then you are all good to proceed
-
Run the bat file. You may get some failures around some of the services. Just make sure you have updated the config to reflect your environment and rerun.
-
Finally, set an auto shutdown policy in azure to save those credits
Last word
You should now have a fully functioning SharePoint 2010 environment that you can access over the internet. Mine is off most of the time put should i ever need it I can run the following
$rgName = "sharepoint-migration-dev"

#Startup
Start-AzVM -Name adVM -ResourceGroupName $rgName
Start-AzVM -Name sqlVM -ResourceGroupName $rgName
Start-AzVM -Name sp10VM -ResourceGroupName $rgName

#Shutdown
Stop-AzVM -Name sp10VM -ResourceGroupName $rgName -Force
Stop-AzVM -Name sqlVM -ResourceGroupName $rgName -Force
Stop-AzVM -Name adVM -ResourceGroupName $rgName -Force