Using Google Maps API with Xamarin Android on macOS
I’ve recently been working on an app where I needed to include a small map with a point of interest marked. In Xamarin.iOS this is very straight forward using the MapKit Framework. However when it came to android it seemed much more complicated. Obtaining the API key was straight forward enough, there is a great guide from Microsoft which will help you.
Whilst it does cover obtaining the keystore hashes, I thought everything was configured but my Map fragment would never load. It only ever displayed grey outline with the google text in the bottom left.

I tried all sorts to get this to work until I finally realised I hadn’t obtained all the Keystore hashes.
Obtaining Keystore hashes
As you know, for Google Maps to work in your app you need an API key. But to get this to work securely with your app you need to get a number of SHA-1 hashes.
- Debug Keystore
- Release Keystore
- Playstore App Signing key
keytool
To be able to get SHA-1 hash or fingerprint from the Keystores you need to use the keytool from the JDK. To locate to keytool, first locate your java home my running the following in terminal.
/usr/libexec/java_home
You will then want to navigate to bin in your java home directory. This is where keytool is located
Library/Java/JavaVirtualMachines/[VERSION].jdk/Contents/Home/bin
They keytool is run using the following command. However we do not have all the information yet.
keytool -list -v -keystore [STORE FILENAME] -alias [KEY NAME] -storepass [STORE PASSWORD] -keypass [KEY PASSWORD]
Debug Keystore
By default the debug keystore is located at the following location
/Users/[USERNAME]/.local/share/Xamarin/Mono\ for\ Android/debug.keystore
We can now run the keytool for the debug keystore using the following command.
keytool -list -v -keystore /Users/[USERNAME]/.local/share/Xamarin/Mono\ for\ Android/debug.keystore -alias androiddebugkey -storepass android -keypass android
The alias for the debug key is androiddebugkey and both the storepass and keypass are android.
You should get an output similar to the following:
Alias name: androiddebugkey
Creation date: 20-Oct-2017
Entry type: PrivateKeyEntry
Certificate chain length: 1
Certificate[1]:
Owner: CN=Android Debug, O=Android, C=US
Issuer: CN=Android Debug, O=Android, C=US
Serial number: 6ab0eb7c
Valid from: Fri Oct 20 14:24:53 BST 2017 until: Sun Oct 13 14:24:53 BST 2047
Certificate fingerprints:
    MD5:  0A:D3:7E:80:3D:40:2A:23:89:B9:AB:9C:4B:B6:63:36
    SHA1: 89:33:8F:F2:C5:0C:91:08:4A:CF:04:A5:EC:4A:31:80:84:18:0D:D4
    SHA256: 91:AC:3E:2F:CB:EF:50:07:2B:E0:D9:8D:8B:C2:42:87:6A:85:02:86:EB:44:84:10:34:02:ED:35:CE:C6:38:47
    Signature algorithm name: SHA256withRSA
    Version: 3
You need the SHA1 hash.
Release Keystore
When you use Visual Studio to Sign and Distribute your app, teh keys you create will be stored in the following directory:
/Users/[USERNAME]/Library/Developer/Xamarin/Keystore/[ALIAS]/[ALIAS].keystore
You now need to find the key that you are using to sign your app. e.g. You are using a key with the alias fortnite
keytool -list -v -keystore /Users/[USERNAME]/Library/Developer/Xamarin/Keystore/fortnite/fortnite.keystore -alias fortnite -storepass certpassword -keypass certpassword
The storepass and certificate password are again the same. It’s the password you use when you are using Visual Studio to sign and distribute your app.
Once run you should see a similar output to when you ran this for the debug key. Again note the SHA1 hash.
Playstore (App Signing) Key
The final SHA-1 hash you will need is your Playstore App Signing key. This is because your .apk files that you upload to play console are signed with another key as they are published to the store. This key can be found under Release Management > App Singing.
There will be two certificated here:
- Your upload certificate, this should match the SHA-1 you obtained for your Release key.
- You app signing certificate, note down the SHA-1 for this.
You should now have three SHA-1 hashes
Adding the hashes to API project
Once you have obtained your Google Maps API key you will want to lock it down so only your app can use it. As we have already obtained the key hashes this is simple.
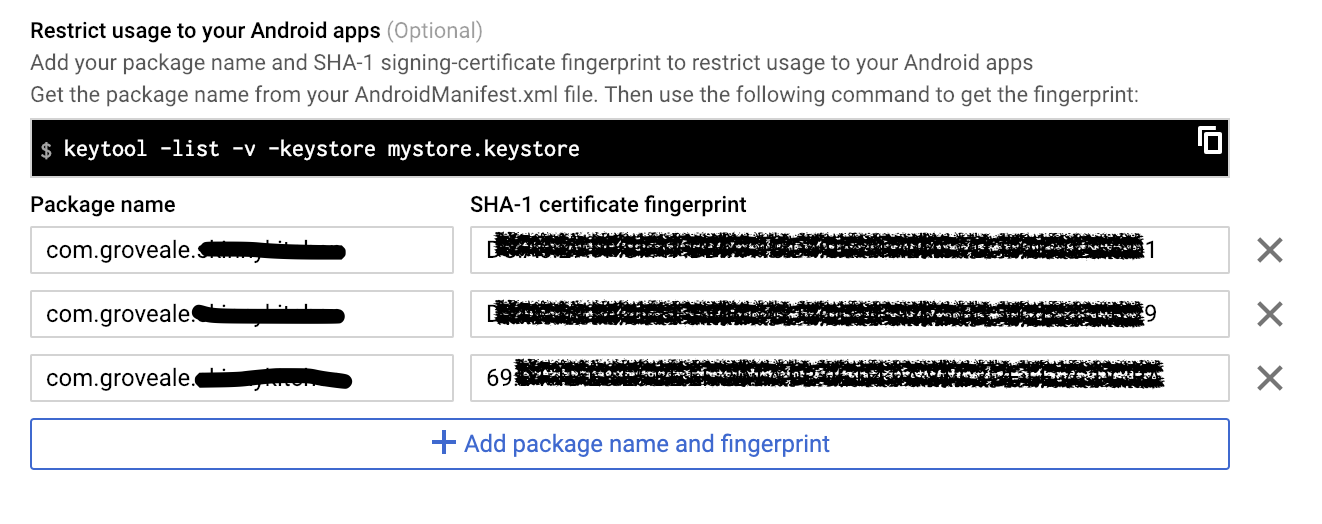
Go to your Google Cloud platform, select the API project. Go to Credentials, click edit and scroll down to the Application Restriction section.
Choose Android apps and add your 3 SHA-1 fingerprints with the package name as it appears in your AndroidManifest.xml
Troubleshooting
If you are still seeing a grey background in your map. It’s likely the key you are using has not been added to your API project. You can check you application output/logs for Google Maps Authorizations failures.
The example below is for a debug build of mine where I forgot to include the fingerprint of the debug key.
[Google Maps Android API] Authorization failure.  Please see https://developers.google.com/maps/documentation/android-api/start for how to correctly set up the map.
[Google Maps Android API] In the Google Developer Console (https://console.developers.google.com)
[Google Maps Android API] Ensure that the "Google Maps Android API v2" is enabled.
[Google Maps Android API] Ensure that the following Android Key exists:
[Google Maps Android API] 	API Key: BHiurSyA8PGvnvwBVJywyJJEdvKCn1GvWQGB9BRx [Not a real API key]
[Google Maps Android API] 	Android Application (<cert_fingerprint>;<package_name>): 89:33:8F:F2:C5:0C:91:08:4A:CF:04:A5:EC:4A:31:80:84:18:0D:D4;com.groveale.packagname
Hopefully this has helped you ensure google maps will display properly in all releases of your apps.